

Well the byes are upon us very soon. I imagine that you've considered the byes a little bit but possibly haven't focused completely on them at this stage. That's the case with me anyway. Prior to round 1 I had a quick look to make sure I had around 18 players available and an even spread of premiums/mid-pricers and rookies. Since then, however, I haven't really considered the byes.... until now.
How do the byes work?
During the bye rounds your score will be taken from your 18 best on-field players regardless of their position. The term 'on-field' literally means on your field. For example, if your 10 best scoring players are your 8 on-field midfielders and the 2 on the bench, it would only take the 8 on the field. It's unlikely that you'll have many bench players anyway, but if you do it's a great chance to use your DPP (dual position) players. As you can see in round 9, if my team stayed as it is, I have 9 midfielders. However I purposely made my M9/M10 Tom Langdon and Lewis Taylor as one of them is mid/def and the other is mid/fwd; they're deliberately in the midfield for situations like this. So in my instance, I will be swapping Langdon to defense with Sam Mitchell for that week to give me an extra player on-field.
When do teams have their bye?
Round 8: Adelaide, North Melbourne, Gold Coast, Richmond, Collingwood, Geelong.
Round 9: GWS, Port Adelaide, Western Bulldogs, West Coast, Carlton, Hawthorn,.
Round 10: St.Kilda, Sydney, Brisbane, Essendon, Fremantle, Melbourne.
How can I approach the byes with my side?
Firstly, make a plan like mine above and just check out the spread of your players during the bye rounds. To make the plan easy and simple I considered someone like Polec as a rookie depsite his average of 95 and players like Martin and Suckling as premiums despite their sub 90 average. Once you've done that, consider the following two things.
If you look at the number of players available and round 8 has only 13-14 players available (possibly round 9 as well) or you're only focusing on league wins (not overall position) and want to lock in two wins, here's what you can do:
You can load up your side with 20-22 on-field players for two of the three bye rounds. Round 8 is likely the be the round where teams have lots of players missing, e.g. Swan, Ablett, Swallow, Beams, Pendles, etc... If you only have 13 players (for example) looking like being available in round 8, I can't see any benefit in you trading in an extra two prior to round 8 to bring that number to 15; as they'll have a bye in round 9 or 10 anyway. You can still trade players into your side during the byes but just make sure you get players AFTER they've had their bye.
If you're chasing a decent overall position and notice your team has a good balance of available players over the three rounds OR you only have around 14-16 players in your round 10 side, you can do the following:
You need to try your best to have at least 18 players for each round - otherwise you'll cop a 0 - and it can be very tricky to do. Round 8 is going to be the hardest, as if you bring players in to have a decent side in round 8 they're going to miss either round 9 or 10. Be aware of this, but remember that everyone is in the same boat. It may make more sense when I explain what I am doing with my side. If you look at your side and you've got a decent amount of players available for round 8 and 9, but round 10 is looking a bit sad, do not freak out! Don't give up on round 10, but read below about how to trade during the byes.
Trading during byes
First of all, leading into the byes, I would suggest to not go crazy chasing players to fill round 8 spots. You can only do the best that you can, but you may have to sacrifice round 8 for the benefit of round 9 and 10. I have 16 players in round 8, at this stage, and I will bring in 1, maybe 2 players (which you can read about below) but I'm also well aware of how that will affect the other bye rounds. Once round 8 has passed everything will run a lot more smoothly. You can then start trading a bit more freely. You might have built up cash to do a double upgrade or do an upgrade and downgrade straight after round 8. Players you should trade in during the byes are players who have just come off a bye. For example, Collingwood have a bye in round 8, so if you want one of those guys in your side (Swan, Pendlebury, etc..) wait until they've had their bye and then trade them in for round 9 as they'll also be there for you in round 10. On the flipside, you wouldn't trade in Nick Riewoldt in round 9 because you would have him for 1 round and then he is gone in round 10. The reason why it is fine if you've only got 14 or so players for round 10 is that over 2 weeks of trading during the byes, you can fill that hole. This is completely hypothetical, but pretend at this stage I only had 14 players in round 10. If I traded in Pendlebury and Fasolo for round 9, then for round 10 I brought in Selwood and Wines, I would have worked my way to 18 players for round 10 and also made some decent upgrades in the process. Don't forget that it is not even half way through the season so you don't HAVE to trade flat out during the byes; it's up to you. Trading will make your team stronger for each bye round (particularly round 9/10) but you'll be chewing up trades that can be used later for injuries and form drops. I plan on trading during the byes but stopping for a few weeks after. If you're comfortable with just a couple of trades to bring you a good balance of players available for each bye round and you think each week your team's quality is good to bring you a solid scoring 18, then feel free to not trade as heavily as some other SuperCoaches.
What am I going to do?
In my planning before the season I had a better amount of players available for round 8, which is the trickiest bye round. However the downgrades and upgrades I made were completed with little consideration toward the byes. It definitely hasn't ruined my chances during the bye rounds though. I have 20 players available for round 9, which is plenty, especially because after round 8 I plan on bringing extra players in. What I can do is sacrifice one or two players now from the round 9 team to bring in players for round 8. Ryan Griffen was on my radar anyway, and if he produces a decent score this week he might be my guy. He suits my team because he's going to be around 500k, but he also has a round 9 bye. To get him in I will also downgrade a current round 9 or 10 playing rookie, to a rookie playing round 8. That gives me 18 for round 9, which is possibly better than other teams can produce. As I'd have lost those two players for round 9, I will definitely do 1-2 trades leading into round 9, getting someone in who has just had a bye. I am thinking probably Joel Selwood as he'll have dropped a fair few dollars by then and possibly a rookie as well. Getting Selwood and a rookie (fresh off round 8 bye) in also boosts my round 10 numbers by 2. That can be enhanced even further by bringing another 1-2 players prior to round 10.
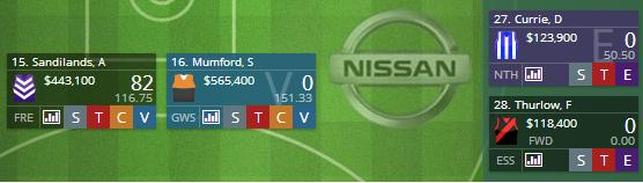
Please note that in my calculations of how many players I have available, I have assumed Currie & Thurlow won't be back into their sides, Sam Lloyd will be dropped by Richmond (here's hoping he won't be) and that Clay Cameron will still be out injured. My situation will be even better if some of those players are playing during the bye rounds. You will need to consider the same if you have injured players or players that may be dropped or not in their respective sides by the bye rounds.
Don't hesitate to drop me a comment if you have any comments or questions. Other ways to contact me are on twitter (@AaronSCHQ) or via email ([email protected]).
Cheers,
Aaron.
How do the byes work?
During the bye rounds your score will be taken from your 18 best on-field players regardless of their position. The term 'on-field' literally means on your field. For example, if your 10 best scoring players are your 8 on-field midfielders and the 2 on the bench, it would only take the 8 on the field. It's unlikely that you'll have many bench players anyway, but if you do it's a great chance to use your DPP (dual position) players. As you can see in round 9, if my team stayed as it is, I have 9 midfielders. However I purposely made my M9/M10 Tom Langdon and Lewis Taylor as one of them is mid/def and the other is mid/fwd; they're deliberately in the midfield for situations like this. So in my instance, I will be swapping Langdon to defense with Sam Mitchell for that week to give me an extra player on-field.
When do teams have their bye?
Round 8: Adelaide, North Melbourne, Gold Coast, Richmond, Collingwood, Geelong.
Round 9: GWS, Port Adelaide, Western Bulldogs, West Coast, Carlton, Hawthorn,.
Round 10: St.Kilda, Sydney, Brisbane, Essendon, Fremantle, Melbourne.
How can I approach the byes with my side?
Firstly, make a plan like mine above and just check out the spread of your players during the bye rounds. To make the plan easy and simple I considered someone like Polec as a rookie depsite his average of 95 and players like Martin and Suckling as premiums despite their sub 90 average. Once you've done that, consider the following two things.
If you look at the number of players available and round 8 has only 13-14 players available (possibly round 9 as well) or you're only focusing on league wins (not overall position) and want to lock in two wins, here's what you can do:
You can load up your side with 20-22 on-field players for two of the three bye rounds. Round 8 is likely the be the round where teams have lots of players missing, e.g. Swan, Ablett, Swallow, Beams, Pendles, etc... If you only have 13 players (for example) looking like being available in round 8, I can't see any benefit in you trading in an extra two prior to round 8 to bring that number to 15; as they'll have a bye in round 9 or 10 anyway. You can still trade players into your side during the byes but just make sure you get players AFTER they've had their bye.
If you're chasing a decent overall position and notice your team has a good balance of available players over the three rounds OR you only have around 14-16 players in your round 10 side, you can do the following:
You need to try your best to have at least 18 players for each round - otherwise you'll cop a 0 - and it can be very tricky to do. Round 8 is going to be the hardest, as if you bring players in to have a decent side in round 8 they're going to miss either round 9 or 10. Be aware of this, but remember that everyone is in the same boat. It may make more sense when I explain what I am doing with my side. If you look at your side and you've got a decent amount of players available for round 8 and 9, but round 10 is looking a bit sad, do not freak out! Don't give up on round 10, but read below about how to trade during the byes.
Trading during byes
First of all, leading into the byes, I would suggest to not go crazy chasing players to fill round 8 spots. You can only do the best that you can, but you may have to sacrifice round 8 for the benefit of round 9 and 10. I have 16 players in round 8, at this stage, and I will bring in 1, maybe 2 players (which you can read about below) but I'm also well aware of how that will affect the other bye rounds. Once round 8 has passed everything will run a lot more smoothly. You can then start trading a bit more freely. You might have built up cash to do a double upgrade or do an upgrade and downgrade straight after round 8. Players you should trade in during the byes are players who have just come off a bye. For example, Collingwood have a bye in round 8, so if you want one of those guys in your side (Swan, Pendlebury, etc..) wait until they've had their bye and then trade them in for round 9 as they'll also be there for you in round 10. On the flipside, you wouldn't trade in Nick Riewoldt in round 9 because you would have him for 1 round and then he is gone in round 10. The reason why it is fine if you've only got 14 or so players for round 10 is that over 2 weeks of trading during the byes, you can fill that hole. This is completely hypothetical, but pretend at this stage I only had 14 players in round 10. If I traded in Pendlebury and Fasolo for round 9, then for round 10 I brought in Selwood and Wines, I would have worked my way to 18 players for round 10 and also made some decent upgrades in the process. Don't forget that it is not even half way through the season so you don't HAVE to trade flat out during the byes; it's up to you. Trading will make your team stronger for each bye round (particularly round 9/10) but you'll be chewing up trades that can be used later for injuries and form drops. I plan on trading during the byes but stopping for a few weeks after. If you're comfortable with just a couple of trades to bring you a good balance of players available for each bye round and you think each week your team's quality is good to bring you a solid scoring 18, then feel free to not trade as heavily as some other SuperCoaches.
What am I going to do?
In my planning before the season I had a better amount of players available for round 8, which is the trickiest bye round. However the downgrades and upgrades I made were completed with little consideration toward the byes. It definitely hasn't ruined my chances during the bye rounds though. I have 20 players available for round 9, which is plenty, especially because after round 8 I plan on bringing extra players in. What I can do is sacrifice one or two players now from the round 9 team to bring in players for round 8. Ryan Griffen was on my radar anyway, and if he produces a decent score this week he might be my guy. He suits my team because he's going to be around 500k, but he also has a round 9 bye. To get him in I will also downgrade a current round 9 or 10 playing rookie, to a rookie playing round 8. That gives me 18 for round 9, which is possibly better than other teams can produce. As I'd have lost those two players for round 9, I will definitely do 1-2 trades leading into round 9, getting someone in who has just had a bye. I am thinking probably Joel Selwood as he'll have dropped a fair few dollars by then and possibly a rookie as well. Getting Selwood and a rookie (fresh off round 8 bye) in also boosts my round 10 numbers by 2. That can be enhanced even further by bringing another 1-2 players prior to round 10.
Please note that in my calculations of how many players I have available, I have assumed Currie & Thurlow won't be back into their sides, Sam Lloyd will be dropped by Richmond (here's hoping he won't be) and that Clay Cameron will still be out injured. My situation will be even better if some of those players are playing during the bye rounds. You will need to consider the same if you have injured players or players that may be dropped or not in their respective sides by the bye rounds.
Don't hesitate to drop me a comment if you have any comments or questions. Other ways to contact me are on twitter (@AaronSCHQ) or via email ([email protected]).
Cheers,
Aaron.


 RSS Feed
